How-To: Re-draft or Create a Pattern

All of this girls at Touche de Mode are avid crafters, seamstresses, and general DIY-ers. As a seamstress, one of the most common problems that I run into is finding a pattern that is just how I want my garment to be. I almost always have to change something about it to create the piece that I see in my head. Oftentimes, I make these changes by basting the seams and pinch-and-pin-ing the garment to how I want it before sewing the final seams. However, this method is generally more time consuming, less accurate, and harder work. Thus, I think it is preferable to start with a perfect pattern.
However, it is sometimes nearly impossible to find a pre-made pattern to your liking, or you simply do not want to spend the money to buy a new pattern. This is when re-drafting and creating your own pattern comes in handy. Re-drafting is not as intimidating as it sounds, and needn't be expensive. Chances are that you probably already have all the material and brain power you need!
Materials

To re-draft/create your own pattern you will need:
-Waxed paper or parchment paper (this is an inexpensive alternative to tracing paper)
-Pencil
-Permanent marker
-Permanent marker
-Scissors
-Ruler and/or measuring tape
-Existing pattern(s) to be redrafted or combined
Instructions

Step 1: Figure out your design

The first thing you need to do I figure out what you're trying to create. I usually have a picture in my mind of what I want, and that is usually enough to guide the re-drafting process. Sometimes it is useful to sketch out what you want.
Step 2: Search your patterns


With your design in mind, look through your existing patterns to see which ones have elements that you need to make your design. For example, you may like the bodice of a dress pattern, the neckline of another dress pattern, and the cut of a different skirt pattern. Think about why you like those patterns (the darts, the shape, etc) and think about how you can combine those elements taking into account the features of the other pieces. You need to figure out how to synthesize the good points and minimize the bad points of the patterns.
Step 3: Find and align reference points


Once you know how you want to combine the patterns, you need to find reference points on the patterns to make sure that your finished piece is proportionate. Determine if your patterns already give seam allowance. Does one pattern give 1/2" seam allowance, another give 5/8", and another give no seam allowance? Plan accordingly. Find the waistline, center front/back, and other reference points effecting the areas being modified. For example, if you want to attach a different skirt to a dress, match up both patterns at the waistline, center front/back, and where any hardware will be inserted.
Step 4: Trace new pattern

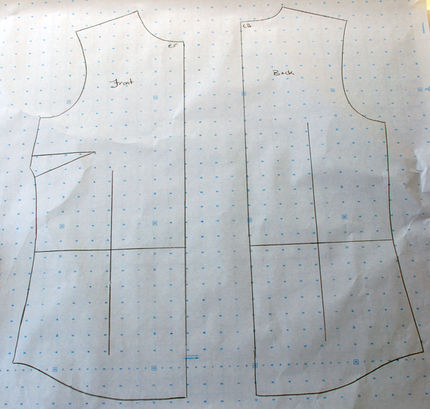
One of the benefits of using waxed paper or parchment paper as opposed to tracing paper is that you can make it at large or as small as you want. Tape together waxed paper to be the size needed. With the pencil, trace the aligned patterns on the waxed paper. Using a ruler, or pattern eights can be very useful.
Step 5: Check measurements and retrace
Once you've traced your new pattern preliminarily, check to make sure that the measurements are correct. You don't want to cut and sew your new garment to realize that you made the waist six inches too small! If necessary adjust your pattern to the correct measurements. Retrace with the permanent marker.
Step 6: Transfer markings and label pattern pieces


Before lifting the new pattern, don't forget to transfer the markings. Darts (existing or new), notches, zipper markings, waistline, grain line, and special seam lines are each extremely important in making your pattern all that it should be. In the excitement of the the moment it is also easy to neglect marking your pieces. This only leads to confusion later, either when you use the pattern or store it and forget what pattern it is. I usually write what pattern it is a part of, the number of the piece, the name of the piece, how many cuts of the piece are needed, if lining is needed, if interfacing is needed
Step 7: Cut out and store your new pattern


Congratualtions! Cut out your new pattern! If I am not using the pattern right away I fold and put all the pieces in a sheet protector in a special binder that I have for patterns. With it I also put any sketches I have of the pattern, a brief description, and (once I've used the pattern) a picture of the completed project.
This technique is super versatile. You can use it to salvage vintage patterns, create copies of patterns, experiment with different combinations, and (once you're comfortable) draft original patterns from scratch!This has been such a help to my sewing ventures that I keep a box of waxed paper and a permanent marker in my sewing table!
I hope you'll be as delighted as I am with this technique!
posted by Catherine at
12:17 AM
0 Comments
![]()
![]()
